I’m never sure whether they are pronounced ‘GIF’ or ‘JIF’ but, either way, these short, looping visuals are fantastic at clarifying complex processes (e.g. oscillations in transverse and longitudinal waves, the cardiac cycle, diffusion, ventilation, phagocytosis, etc.) .
Seeing simple movements on repeat can be far more effective in developing understanding than a static image or flow map and they are easily added to presentations on PowerPoint or Slides. You can search for GIFs under Google Images by simply adding .gif to your search term. The website Giphy has a huge library of GIFs and also allows you to make your own, either by organising a set of still pictures into an animation (a bit like a flip book) or by cropping existing videos. As with all audiovisuals, GIFs should only be used if they are relevant and benefit the learning by furthering understanding. Adding GIFs to lesson presentation slides for presentation purposes or in an attempt to ‘hook’ the pupils’ interest is likely to distract from the lesson content and, if not well chosen, could foster misconceptions about the material being taught.
This year I trialled a new initiative at my school called Brighton Sparks. Aimed at our most able and gifted pupils in years 8-10 and offered as part of our existing programme of co-curricular activities, it ran successfully (albeit largely via Google Meet) in spite of extended periods of site closure due to COVID-19.
The aim of Brighton Sparks is to help pupils develop academic writing and supra-curricular study skills such as independent learning, secondary research, time management and referencing. These qualities are sadly overlooked by many schools and yet are essential attributes, not only for study at IGCSE and A Level but also beyond. For instance, in a recent survey of university admissions officers, almost half of respondents felt that UK students were not prepared for the step-up to higher education, citing, in particular, a lack of good written English and an inability to think and learn independently:
‘…all respondents unanimously agreed that students must ensure they are “ready to think and learn independently” when asked how students could be better prepared to thrive while successfully completing their degree.’
‘…52 per cent felt they were “unable to carry out extended writing”, and the same number “unable to remember facts, possessing a ‘Google-it’ mentality”
At my school, these skills are already embedded throughout the curriculum but for those pupils who are consistently high achievers or demonstrate a propensity for a particular subject, Brighton Sparks offers them an exciting opportunity to be stretched and challenged even further in areas of their own interest and expertise.
Along with weekly university-style tutorials on topics including Harvard referencing, academic writing, university vs school, and the differences between searching and researching a topic, the pupils were assigned a supervisor (a specialist teacher) with whom they worked one-to-one, and were tasked with writing a 2000 word essay that was marked in accordance with the British Undergraduate Degree Classification System.
The pupils also received presentation skills training and were required to present their research findings to, and field questions from, their teachers and peers (much like a PhD viva voce). At the end of the school year, the pupils received a certificate in assembly and their essays were published in our very own College journal, ‘The Spark.’
Brighton Sparks certificate
This is how it worked…
In the autumn term, pupils in years 8-10 who had been identified as being able and/or gifted (using their stanine baseline, calculated using the GL battery of assessments and teacher referrals) were invited to participate in Brighton Sparks via an in-school introductory presentation and a letter home to parents. At the same time, teachers volunteered to become supervisors and prepared a small number of essay questions on topics in which they had a particular interest and expertise.
Academic essay titles
I produced a guide which I shared with pupils detailing the Brighton Sparks process but also providing support on how to plan and write an academic essay, referencing and presentation skills. Additional resources were shared with pupils via a Brighton Sparks Google Classroom.
The Brighton Sparks guide shared with pupils
Brighton Sparks got underway in the summer term. Unfortunately, the school site was closed due to COVID-19 so it was largely delivered online via Google Meet. Each week, the pupils attended university-style tutorials. These were led by specialists within the school and covered a wide range of topics including:
Secondary research
Planning your essay
Academic writing
Harvard referencing
Boolean operators
School vs university
Presentation skills
The pupils received support and guidance from their supervisors via email correspondence throughout the research and writing process but they were also encouraged to meet one-to-one with them at least twice during the term and this was the responsibility of the pupils to arrange. Pupils for whom English is an Additional Language (EAL) also received support from our EAL Department.
Supervisors marked the essay first using a simple marking rubric comprising five criteria:
Focus and method
Knowledge and understanding
Critical thinking
Presentation
Engagement
A small working party then met to moderate the marking and assign final grades in accordance with the British Undergraduate Degree Classification System (e.g. First Class, Upper Second Class, etc.). In addition, the pupils received diagnostic and constructive feedback; they knew exactly what they had done well and what they could do in order to improve their work.
Finally, the pupils were tasked with delivering a short (<5 minutes) presentation on their research and a reflection of the process as a whole to their peers and teachers, from whom they also successfully fielded questions.
Feedback from participating pupils and staff has been hugely positive (see below) and the model is simple enough to be replicated and / or adapted elsewhere with ease.
‘Brighton Sparks has been such a great experience for me. I have learned so much that I know will help me with the rest of my school career and professional career’ – Year 9 pupil
‘It’s been a pleasure to have this opportunity’ – Year 9 pupil
‘Marvellous experience – I really enjoyed the conversations we have had and the hard work and interest [the pupil] took in this subject’ – Supervisor
‘I loved having the opportunity to study something that I am so interested in and to discuss it with my supervisor’ – Year 8 pupil
‘I have already used what I learned in Brighton Sparks in my Science lessons’ – Year 10 pupil
Looking ahead, I would like to build on what has already been established this year by:
extending Brighton Sparks to include more year groups;
incorporating more research-based projects (e.g. in Science, Psychology, Sport Science, etc);
arranging tutorials with external speakers including industry leaders and academics;
offering trips and visits; and
disseminating supra-curricular skills by asking Brighton Sparks pupils to lead assemblies and workshops for others.
If you have any questions about Brighton Sparks or would like to share how your school provides for AG&T pupils I would be very interested to hear from you.
I have been using booklets in my Year 5 Science lessons for a number of years now and feedback from pupils and parents has always been extremely positive. For me, the main advantages of using booklets are as follows:
The format is standardised – pupils receive a printed copy of the booklet at the start of each unit – there is always much excitement when they do!
They are an excellent resource for pupil practice e.g. in preparation for assessments
They include space for structured / semi-structured notes
In preparing the booklets, I am made to think deeply about the content and structure of each and every lesson
I integrate practicals into the booklets and provide the science technicians with a copy so that they can plan well in advance
They are extremely useful for cover lessons and absentees
They contain shed loads of questions for independent practice and extension activities to stretch and challenge
In the long-term, I have found that they save paper and prevent any last minute print jobs
Adam Boxer wrote a fantastic blog on booklets and how he uses them in his lessons, available here.
Let’s take a look inside my Year 5 Science booklets…
The booklets are divided into discrete lessons each with a title and learning objectives. They also contain space for structured notes (word fills) and semi-structured notes (questions with empty boxes).
Practicals are integrated into the booklets – here, the pupils are asked to investigate which material is the best thermal insulator in order to design a new lunchbox for the Brilliant Bag Company. Scaffolds (e.g. the blank results table and graph axes) are removed as the pupils work their way through the booklets over the course of the year. Key vocabulary is highlighted in blue and aligns with a glossary at the back of each booklet (see below). Note that the conclusion is presented as an email to the product development team at the Brilliant Bag Company.
Here, the pupils investigate which sized parachute causes Willy Wonka’s parachutes (from his chocolate delivery drones) to fall most slowly, and therefore stops the chocolate from breaking.
Traffic lights and unit summaries at the end of each booklet help pupils evaluate their learning and prepare for assessments.
Key vocabulary is highlighted in blue throughout each booklet. This aligns with a keyword glossary.
Each booklet also contains shed loads of questions and additional activities such as word searches and crosswords for independent practice.
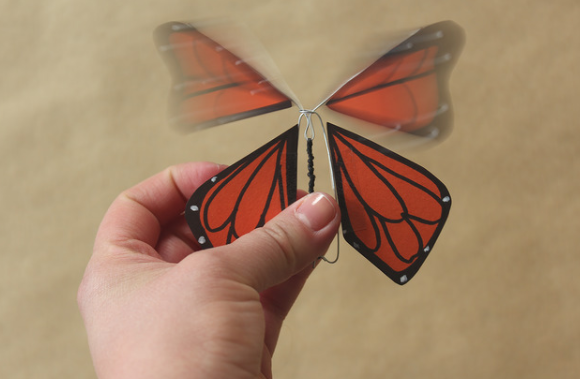
Twitter can be a great source of professional development, inspiration and collaboration for teachers. Just the other day I was looking for a hands-on activity with which to demonstrate elastic potential energy and energy transfer and so I tweeted for ideas. Here are some of the wonderful suggestions I received from the Twittersphere. Thank you everyone for your contributions!
Wind-up butterflies
Image credit: youaremyfave.com. Full instructions available here
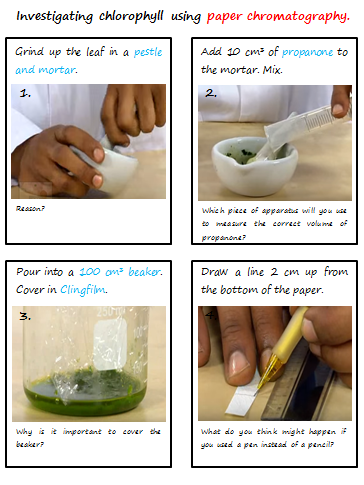
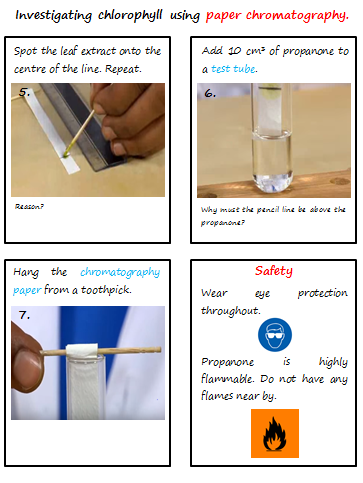
A worksheet is a good way to give instructions of how to carry out practical work safely and effectively. The students can refer to it whenever they are unsure of what to do next and they do not have to waste time copying out the method into their workbook – they can focus on the results and what they mean. However, one of the disadvantages of using worksheets containing detailed instructions is that students can end up following them passively, like a cookery recipe.
In view of this, I have started to develop worksheets for practicals that make extensive use of diagrams or photographs (images can be snipped from instructional videos on YouTube) and the minimum use of words. Furthermore, I include questions about what the students are doing and why they are doing it as discussion points at each stage of the process. Below is an example of one such worksheet that I made for an investigation of chlorophyll using paper chromatography.
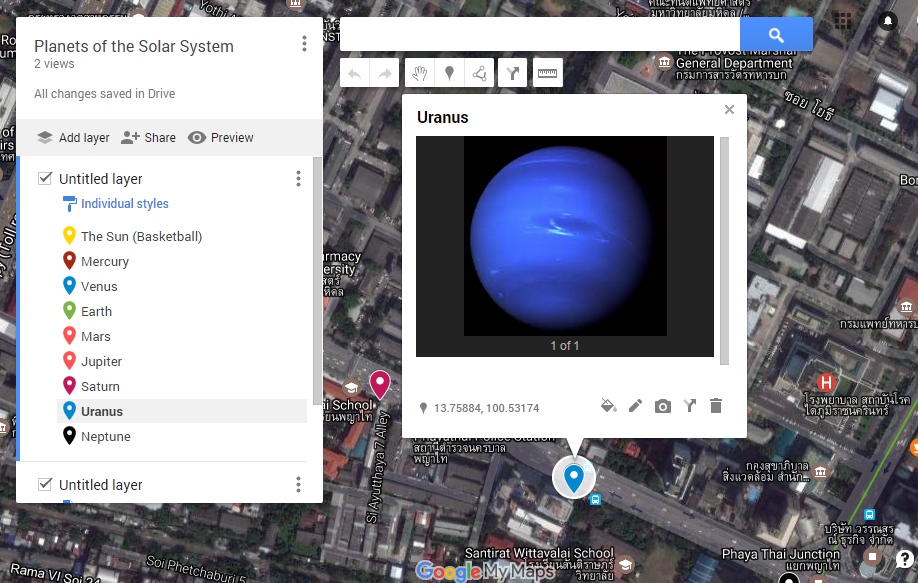
This is a fun activity for imparting the vastness of the solar system. Start by placing a football on the centre spot of the school football field or at the front gate etc. and informing your students that it represents the sun. If the circumference of the football is approximately 70 cm and the circumference of the sun is 4.3 million kilometres, how big would each of the planets in our solar system be (I like to provide a selection of everyday objects such as a tennis ball, apple, ping pong ball, and various marbles etc. for comparison) and how far up the road would they be located? Once the calculations have been made (this can be scaffolded by providing a conversion table or similar) ask the students to plot each planet, centered around the football, on Google My Maps.
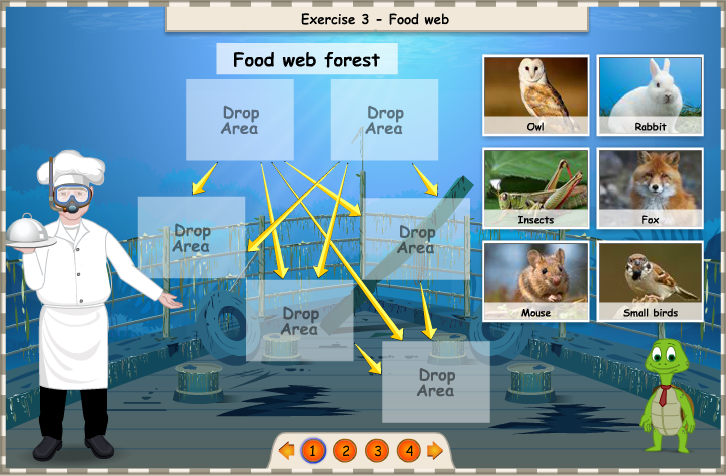
The feeding relationships of the different organisms in an ecosystem can be shown most simply in a food chain. However, in most communities, animals will eat more than one type of organism and as such, a food web gives a more complete picture of exactly what eats what. Below are just a few ideas of how to teach both.
Wildlife documentaries
Wildlife documentaries contain lots of examples of real life (and often quite bloody) food chains and food webs, and asking the students to watch a few snippets before identifying the feeding relationships in each can prove a useful starting point to the lesson.
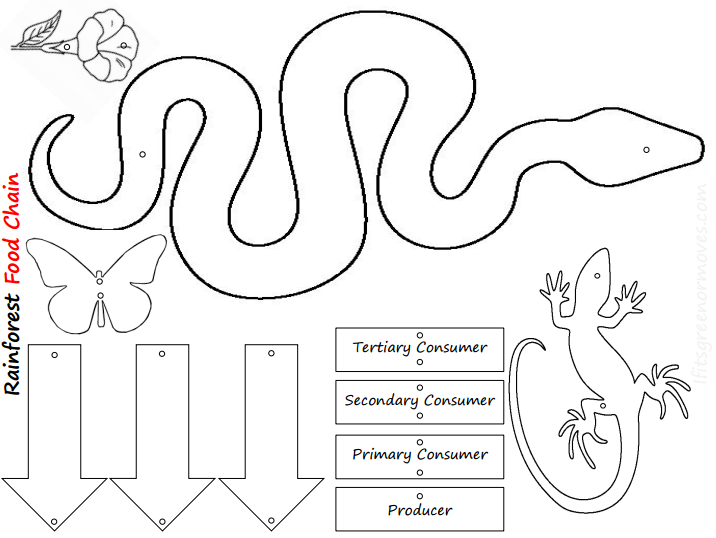
Hanging mobiles
One common mistake when drawing food chains and food webs is for students to put the arrows the wrong way round and it is crucial that you emphasise that they point in the direction of energy flow up the chain. Asking students to construct food chain and food web hanging mobiles can help. You can download templates here or ask the students to make their own.
Energy transfer
Energy transfer in food chains is inefficient; the amount of energy that is passed on is reduced at every step (trophic level). However, great care must be taken to ensure that you do not refer to the energy being lost, since energy can be neither created nor destroyed but rather is converted into some other form or store.
In food chains, much of the energy is transferred to the environment as heat during respiration but obviously some of it is also used by the organism (before it is eaten) in life processes such as movement and growth. Furthermore, not all of a food item may be ingested during feeding and, even if it is, not all parts will be digestible (e.g. lignin and cellulose).
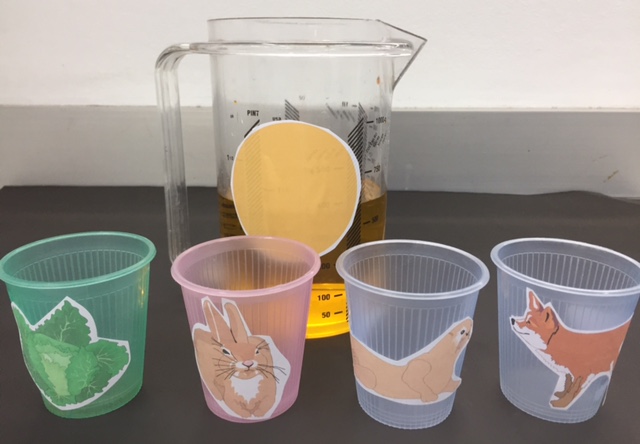
A nice way to demonstrate energy transfer in a food chain is to pour coloured water between paper, plastic or styrofoam cups (each representing a trophic level) and reducing the volume of water transferred each time.
Begin by pouring just 10% of the total volume of water in the jug (the sun) into the first cup (producer). This demonstrates that only about 10% of the sunlight that falls on a plant is used in photosynthesis since most of it is transmitted or reflected, and some of it is simply not the correct wavelength to be absorbed by the photosynthetic pigments in the leaf (only red or blue light is absorbed).
Next, pour roughly 10% of the water in the first cup into the second (primary consumer) and the remainder into another container labelled ‘Respiration (movement, warmth, growth) and excretion’ (do not pour the water down the sink as this will only reinforce the misconception that energy is lost). Repeat this process along the food chain.
By the time you reach the final consumer, only a couple of drops of water will remain. This is a good point in the learning to ask the students why food chains are usually restricted to just three or four trophic levels and why the number of organisms generally decreases along the chain.
Dinner at the Reef
This is a fun game from Arkive in which students learn about food chains in a marine environment, predator-prey relationships and the fine balance of an ecosystem. Although primarily aimed at 7 – 11 year olds it can also be used at Key Stage 3.
Interactive learning websites
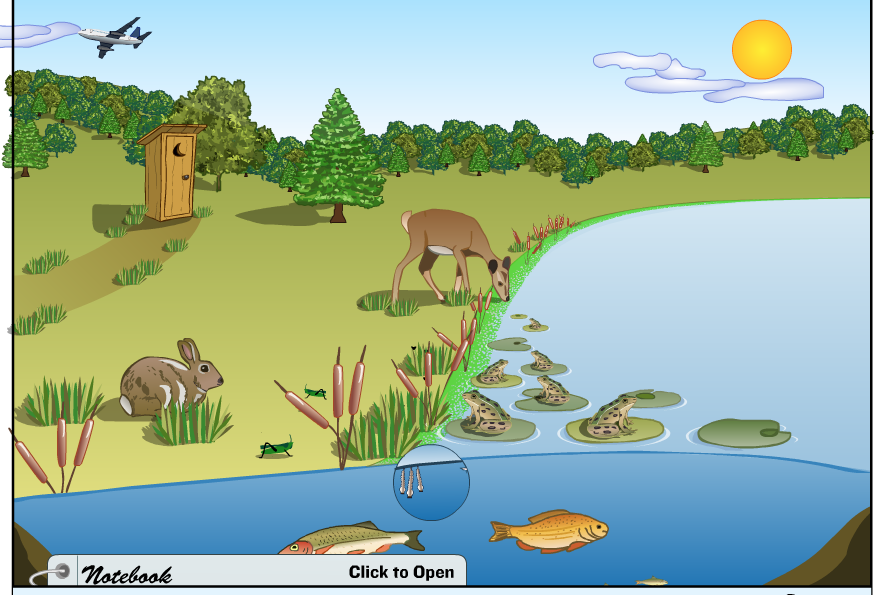
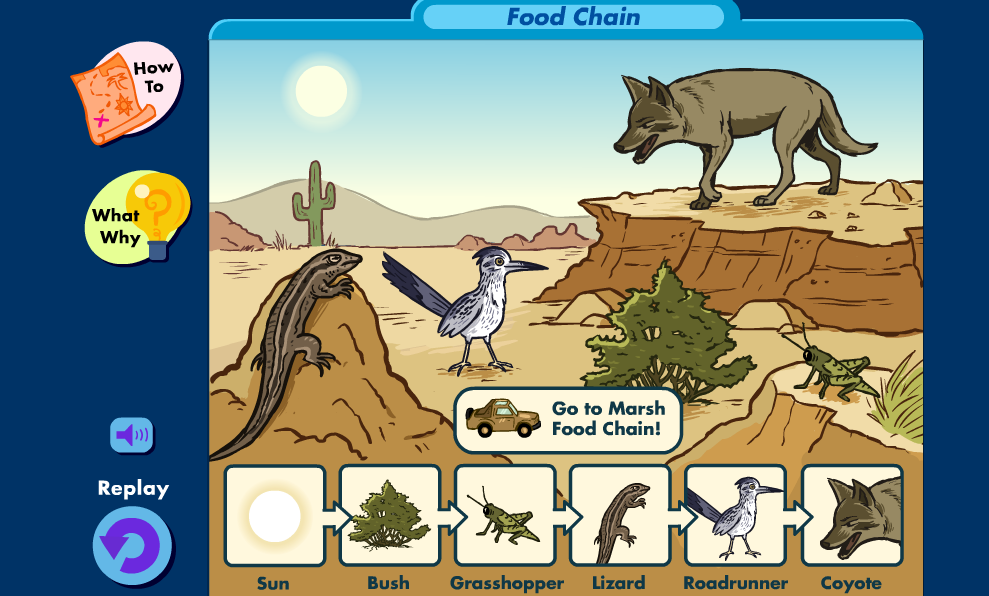
There are now a large number of interactive learning websites offering simulations and simple ‘drag and drop’ style games for teaching younger students about food chains and food webs. Simply click on any of the images below to link.
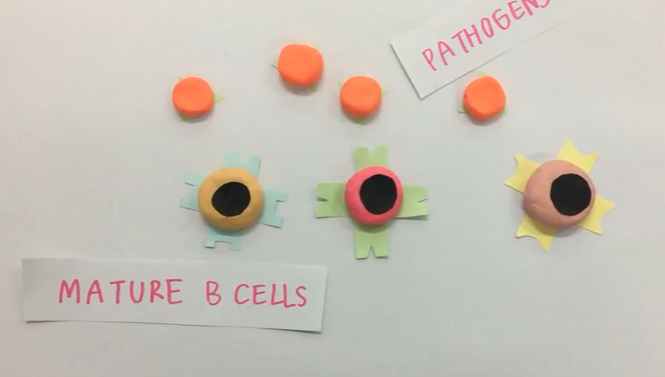
I have recently discovered this wonderful app for making stop motion animated movies on the iPad. It is free to download from the App Store but includes a number of in-app purchases such as sound effects and movie themes which you may wish to invest in. Students can simply draw a sequence of images on paper to photograph or build models using plasticine, Lego or pipe cleaners etc. Most recently, my AS students (who are currently studying a unit on immunity) animated clonal selection and expansion in B-lymphocytes (below), phagocytosis and the action of antibodies.